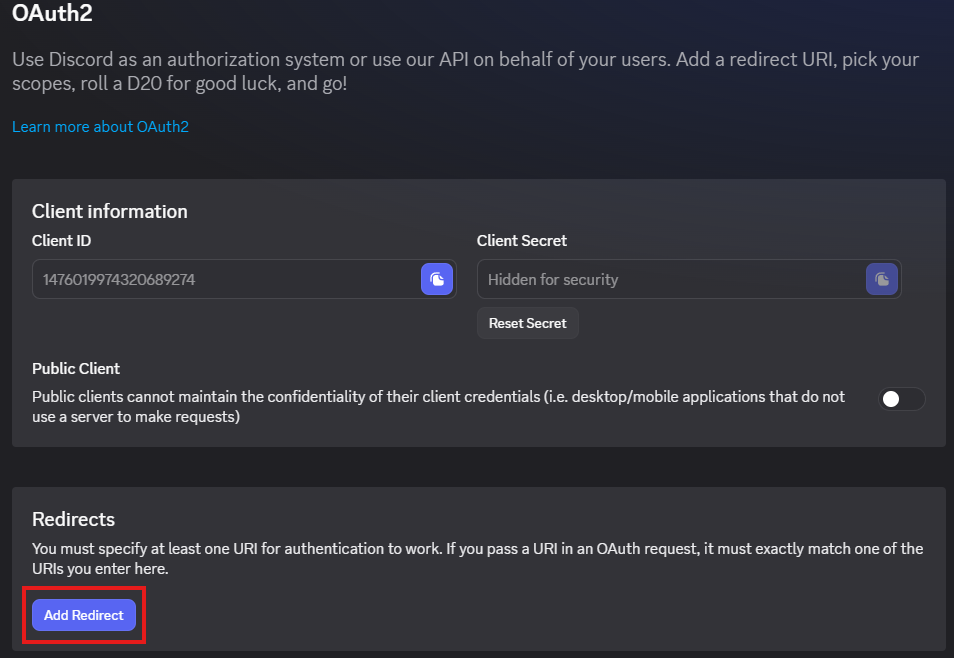
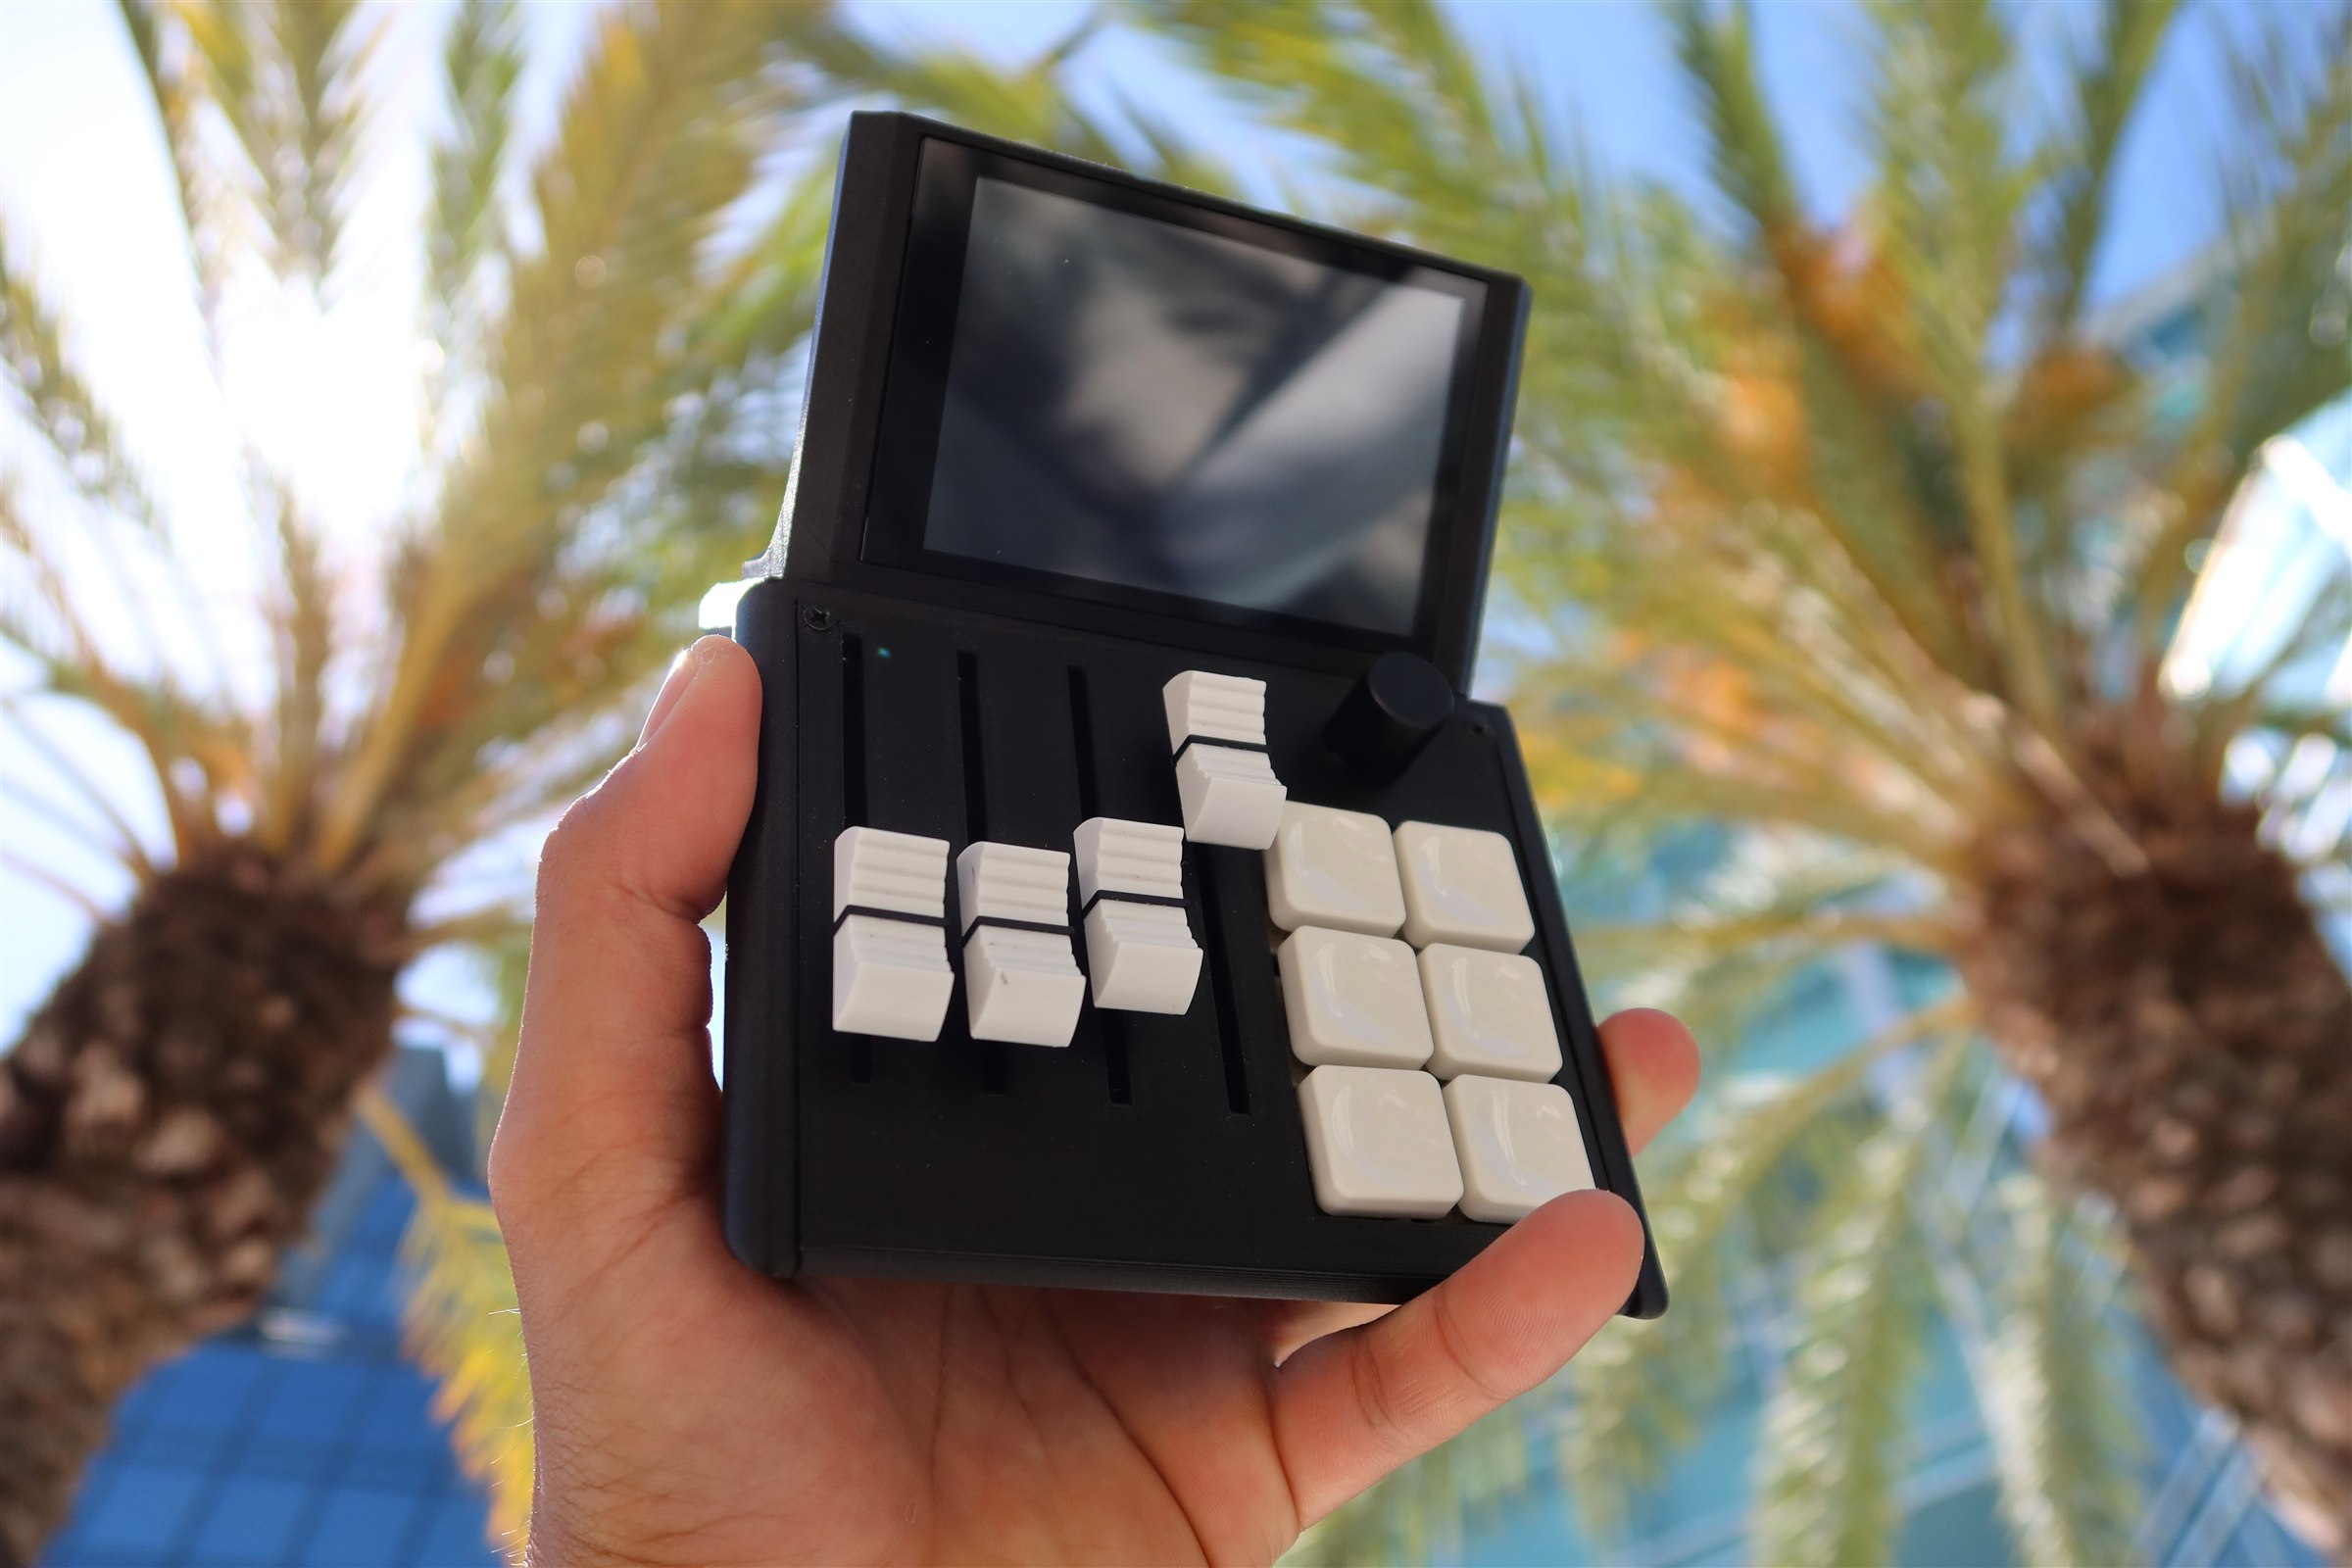
Connect Your Services

Link Mixlar Control to your favourite apps and services.

Spotify

Connect your Spotify account to control playback directly from your Mixlar.

1

Open Spotify settings

In Mixlar Control, go to Settings → Spotify and click Connect.

2

Create a Spotify App

Click the "Create a Spotify App" link inside Mixlar Control. This opens the Spotify Developer Dashboard in your browser.

3

Create a new app

In the Spotify Developer Dashboard, click Create App. Give it any name and description you like.

Spotify Developer Dashboard — click Create app
4

Add the redirect URI

In your app's settings, add the following redirect URI:

http://127.0.0.1:8721/callback

Click Save.

Create app form — enter redirect URI
5

Copy the Client ID

Copy the Client ID from your Spotify app's overview page and paste it into Mixlar Control.

Basic Information page — copy Client ID
6

Authorize with Spotify

Click "Authorize with Spotify" in Mixlar Control. Your browser will open for approval.

7

Approve permissions

Approve the requested permissions in your browser. You'll be redirected back automatically.

8

You're connected

Spotify controls are now available in your macros and sliders. Start controlling your music from your desk.

Tip: You only need to do this once. Tokens refresh automatically.

What you can do

  • Play / Pause
  • Skip / Previous
  • Heart current song
  • Shuffle / Repeat
  • Volume via slider
  • Seek via slider

OBS Studio

Connect OBS Studio to switch scenes, toggle recording, and control sources from your Mixlar.

1

Open WebSocket settings in OBS

In OBS Studio, go to Tools → WebSocket Server Settings.

OBS Studio — Tools menu, WebSocket Server Settings
2

Enable the WebSocket server

Check "Enable WebSocket server". The default port is 4455. Click Show Connect Info to reveal the password.

WebSocket Server Settings — enable server and set password
3

Copy the password

In the Connect Info dialog, click Copy next to the Server Password. You'll paste this into Mixlar Control.

WebSocket Connect Info — copy server password
4

Connect in Mixlar Control

In Mixlar Control, go to Settings → OBS and click Connect.

5

Enter connection details

Enter the host (localhost), port (4455), and paste the password. Click Test Connection, then Save.

Mixlar Control OBS dialog — enter details and save
6

You're connected

OBS is now linked to Mixlar Control. You have access to 23 macro actions for full studio control.

Tip: OBS 28+ has obs-websocket built in. No extra plugin needed.

What you can do

  • Switch scenes
  • Start / stop recording
  • Start / stop streaming
  • Mute / unmute sources
  • Toggle source visibility
  • Take screenshots
  • Pause recording
  • Toggle virtual camera

Home Assistant

Connect Home Assistant to control your smart home devices from your Mixlar.

1

Open your profile in Home Assistant

Open Home Assistant and click your profile icon in the bottom-left corner of the sidebar.

Home Assistant sidebar — click your profile
2

Go to the Security tab

On your profile page, click the Security tab at the top.

Home Assistant profile — Security tab
3

Create a long-lived access token

Scroll down to "Long-lived access tokens" and click Create token.

Long-lived access tokens — click Create token
4

Name your token

Give the token a name (e.g. "Mixer") and click OK.

Name the token and click OK
5

Copy the token

Click the copy button to copy your token. Save it somewhere safe — it won't be shown again.

Copy the access token
6

Connect in Mixlar Control

In Mixlar Control, go to Settings → Home Assistant and click Connect. Enter your Home Assistant URL and paste the token, then click Save.

Mixlar Control Home Assistant dialog — enter URL and token
Tip: Use HTTPS if accessing Home Assistant outside your local network.

What you can do

  • Light brightness via slider
  • Light color via slider
  • Colour temperature via slider
  • Toggle lights on / off
  • Trigger automations
  • Activate scenes

Discord

Connect Discord to control voice, mute, deafen, and per-user volumes from your Mixlar.

1

Create a Discord application

Go to the Discord Developer Portal and click New Application.

Discord Developer Portal — click New Application
2

Name your application

Give it a name (e.g. "Mixlar") and click Create.

Create a new app — enter name and click Create
3

Go to OAuth2

In the sidebar, click OAuth2 to open the OAuth2 settings.

General Information — click OAuth2 in sidebar
4

Add the redirect URL

Under Redirects, click Add Redirect and enter:

http://127.0.0.1

OAuth2 settings — click Add Redirect
5

Save the redirect URL

Type http://127.0.0.1 in the redirect field and save your changes.

Redirect URL entered — http://127.0.0.1
6

Copy Client ID and Client Secret

In the Client information section, click the copy buttons next to the Client ID and Client Secret.

Copy Client ID and Client Secret
7

Connect in Mixlar Control

In Mixlar Control, go to Settings → Discord and click Connect. Paste the Client ID and Client Secret, then click Authorize with Discord and Save.

Mixlar Control Discord dialog — enter credentials and save
Tip: The Discord desktop app must be running for authorization to work.

What you can do

  • Toggle mute
  • Toggle deafen
  • Switch voice channels
  • Noise suppression toggle
  • Per-user volume via sliders
  • Disconnect from voice

3D Printer

Connect your 3D printer to monitor print progress, view temperatures, and control prints from your Mixlar.

1

Open the OctoPrint web interface

Navigate to your OctoPrint instance in a browser (usually http://<printer-ip>).

2

Go to Application Keys

Click the wrench icon (Settings) in the top bar, then navigate to Application Keys under Features.

3

Generate an API key

Enter an application name (e.g. "Mixlar") and click Generate. Copy the generated API key.

4

Enter details in Mixlar Control

In Mixlar Control, go to Settings → 3D Printer and click Connect. Select OctoPrint, enter your printer's IP address and paste the API key. Click Test Connection, then Save.

1

Find your printer's IP address

Your Klipper printer runs Moonraker as its API server. Find the IP address from your printer's network settings or router. The default port is 7125.

Tip: If you use Mainsail or Fluidd, the IP shown in your browser's address bar is the one you need.
2

Enter details in Mixlar Control

In Mixlar Control, go to Settings → 3D Printer and click Connect. Select Moonraker (Klipper), enter the IP address (e.g. 192.168.1.100:7125). No API key is needed. Click Test Connection, then Save.

1

Find your printer's IP address

Make sure your printer is on the same network as your PC. On the touchscreen, go to Settings → Network and note the IP address.

Tip: LAN Only Mode is not required. Your printer works over the local network in both Cloud and LAN Only modes.
2

Get the Access Code

The location depends on your model:

X1C / X1E: Tap the Settings honeycomb → Network tab.

P1P / P1S: Tap the Settings gear — the access code is shown directly.

A1 / A1 Mini: Open Settings and scroll to the third page to find the access code.

3

Get the Serial Number

On the touchscreen, go to Settings → Device Info (under the General tab on X1 series). The serial number is also printed on a sticker on the back or inside of your printer.

4

Enter details in Mixlar Control

In Mixlar Control, go to Settings → 3D Printer and click Connect. Select Bambu Lab, enter the IP address, access code, and serial number. Click Test Connection, then Save.

1

Find your printer's IP address

On your FlashForge printer's touchscreen, go to Settings → Network (or About) to find the IP address. The printer communicates on port 8899 (configured automatically).

2

Enter details in Mixlar Control

In Mixlar Control, go to Settings → 3D Printer and click Connect. Select FlashForge, enter the IP address. No API key is needed. Click Test Connection, then Save.

What you can do

  • Monitor print progress
  • View hotend & bed temps
  • Pause / Resume prints
  • Cancel prints

Welcome back.

Sign in to your Mixlar account

or

Don't have an account? Create one

Create your account.

Join the Mixlar community

or

Already have an account? Sign in